

How To Stop Google Photos From Auto Uploading
1 of the best ways to back upwardly photos and videos is through Google Photos. This Google product comes pre-installed on most smartphones. It automatically backs upwardly photos and videos to the cloud through its "Backup and Sync" feature.
Not everyone wants this sort of fill-in for several reasons. This brings us to the question& "how do you stop Google Photos fill-in?" We will show you how to do this in several means on different devices in this post. In the final section& we will show you an astonishing tool that can assist you manage your clouds easily.
Table of Contents
- Part one: How To End Google Photos Backup On iPhone
- Part two: How to cease Google Photos backup on Android
- Role three: How to stop Google Photos backup on PC
- Part four: Google Photo Alternative
Part 1
Part 1: How To Stop Google Photos Backup On iPhone
At that place are several reasons why people desire to know how to terminate Google Photos fill-in on their devices. Some of them include:
- Storage space issues.
- Security.
- Dull backup.
- Stuck on backup.
- Backup malfunctioning.
Whatever the case is& there are several ways to stop the fill-in of Google Photos on iPhone. We volition prove you some of them in this section.
Method 1 – Plough off Backup and Sync
Google Photos has a feature that allows it to backup photos and videos to the cloud automatically. This feature is known equally "Fill-in and Sync." It is e'er turned on or enabled by default. One of the easiest ways to cease Google Photos from backing up is to disable this feature. Hither is how to turn off Fill-in and Sync on your iPhone:
Step 1 – Launch Google Photos from your device'due south home screen.
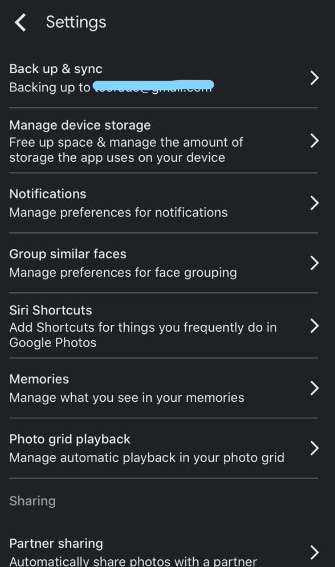
Pace 2 – Tap on the "contour motion picture" icon at the pinnacle-right of the app window.
Stride 3 – Coil down the list of options provided and tap on "Photos Settings."
Footstep 4 – The side by side window reveals another list of options with "Backup and Sync" at the top of the list. Tap on "Fill-in and Sync."
Footstep 5 – The next window reveals a switch beside "Backup and Sync" as well every bit a list of other options. To turn off this feature& toggle the switch off.
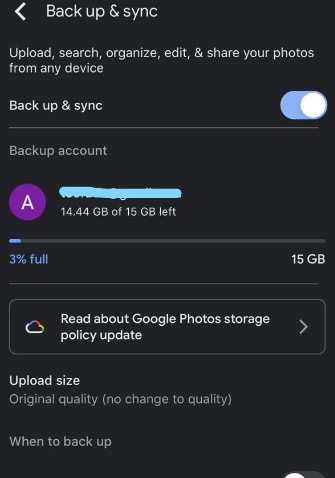
After doing this& Google Photos will end backing upwards to the deject. If this method doesn't work for yous& try the adjacent 1 below.
Method 2 – Delete Google Photos
This is one of the easiest means to stop Google Photos fill-in on your iPhone. It is only logical that you delete the app from your device if yous don't desire the app to fill-in. Doing this is pretty simple& and it takes just a few seconds. Check the steps below to achieve this easily:
Step 1 – Scroll through your home screen to locate Google Photos.
Step 2 – Printing down on the app icon for a 2d. When you do& you should see a list of options.
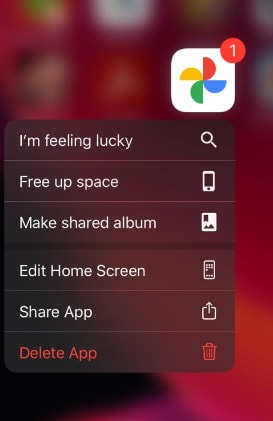
Step 3 – Look through the options and tap on "Delete the app." In one case you do this& Google Photos uninstalls from your iPhone automatically. As such& it tin can no longer backup your photos and videos.
Method 3 – Logout your Google Account
This is the last method to hash out how to stop Google Photos from bankroll up on iPhone. It but requires you lot to logout of your Google business relationship from Google Photos on your device. The steps beneath explicate the process better:
Footstep 1 – Launch Google Photos from your iPhone home screen.
Pace 2 – Tap on the "contour moving-picture show" icon at the top-right corner of your screen.
Step iii – Tap on the downward-facing pointer just beside your business relationship proper name in the next window.
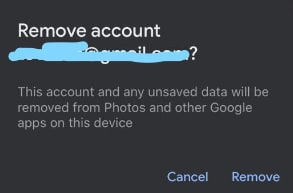
Step 4 – Select "Manage accounts on this device."
Step 5 – In the adjacent window& tap the button labeled "Remove from this device." This should nowadays you with a pop-upwards window. It shows a warning that the account volition be removed from all the Google apps on the device. If you like to become ahead& tap "Remove."
Function 2
Part 2: How to stop Google Photos backup on Android
Once a person isn't using an iPhone& they are very likely using an Android device. If y'all fall into this category& nosotros will bear witness you how to stop fill-in of Google Photos on your device. At that place are different methods& and merely like it is on iPhone& they are all simple and straightforward. Check out the dissimilar methods below:
Method one – Disable Backup and Sync
As we mentioned higher up& Google Photos comes with a feature known as Fill-in and Sync that is always enabled. This feature makes it possible for the app to upload photos and videos from your device gallery automatically.
Turning off Backup and Sync is pretty easy on your Android device. You can do this via the app by going to Photos settings and disabling the feature. To understand information technology better& follow the steps beneath:
Step i – Launch Google Photos app on your Android device.
Step 2 – Tap on the Profile Picture icon and ringlet down the listing of options.
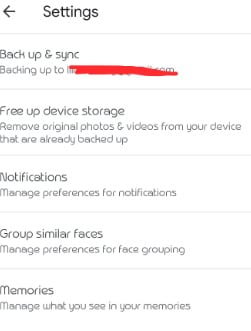
Step 3 – Tap on "Photos Settings" to open a new window.
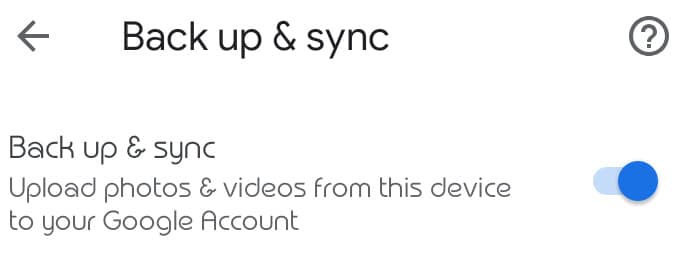
Step 4 – The new window presents you with a listing of options with Backup and Sync as the kickoff list. Tap on Fill-in and Sync.
Step v – This leads you lot to a new window. Toggle off the switch beside Backup and Sync in the new window to disable this characteristic. Once you do this& Google Photos will terminate backing up photos and videos directly.
Method ii – Remove your Google Business relationship from Google Photos
One of the easiest ways to stop Google Photos fill-in on an Android device is to remove your Google business relationship. Remember that the app is linked to your Google business relationship. When you remove the business relationship& the app has nowhere to back up your photos and videos.
The process is pretty like shooting fish in a barrel and straightforward. You tin do this from Google Photos. However& we should warn that removing your account from the app ways that y'all can't access other backups on that account. This means you will be logged out from Gmail& Drive& Docs& and other Google apps. Information technology as well means that you won't have admission to your messages and contacts stored on Google.
Yous can always log the business relationship back in when yous demand to. Check the steps beneath to help yous remove your Google account from Google Photos:
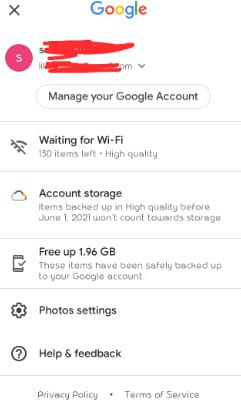
Stride 1 – Launch Google Photos.
Pace 2 – Tap on the profile moving picture icon at the height-correct corner.
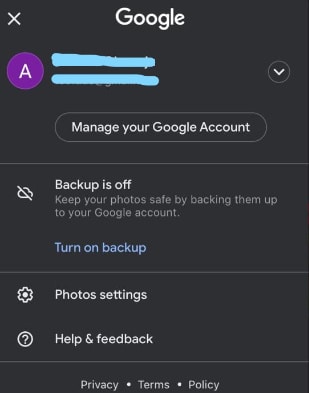
Step 3 – Tap on "Manage your Google Account."
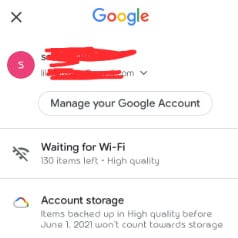
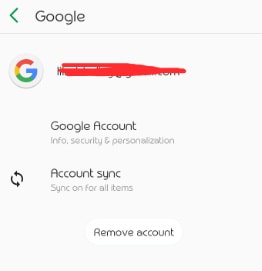
Step 4 – Tapping on that button opens a new window. Here& tap on the downward pointing pointer beside your electronic mail accost. This presents to y'all all the Google accounts linked to your device and two other options. They are "Add some other account" and "Manage accounts on this device."
Stride 5 – Tap on "Manage accounts on this device" and select the linked email address.
Step half-dozen – Select "Remove account." Yous will come across a popular-up message request if you want to become ahead with the procedure. Tap on "remove account." Doing this disengages your Google Account from the app. As such& Google Photos will finish bankroll up.
Method iii – Other measures
At that place are several other measures that y'all can take to stop the fill-in of Google Photos on your Android. We volition explain the nearly common ones in this section of this mail.
Disconnect from Wi-Fi
By default& Google Photos on your device is set to upload photos and videos when connected to a Wi-Fi network. This ways that one time your device connects to a wireless network with the internet& it begins to upload files. An easy way to stop this is to disconnect from the Wi-Fi network. You can do this by toggling off the Wireless selection on your Android device.
Power off the device
Another thing you can practice is to switch off your Android device. This comes in handy when the backup is stuck on uploading a unmarried file for a long time. Printing down the "power button" on your device. This reveals 2 options& "Power off" and "Reboot." Yous can choose any of these buttons since they will both shut downwards your device in the interim.
Turn off your mobile network
If yous accept adjusted Google Photos to upload using your mobile network& then this pick is viable. It would assist if you used this when yous feel it is necessary to cease Google Photos from backing upward to save mobile data. Turn off your mobile information from your "Quick Settings" tray. You lot can also go to "Backup and Sync" nether the "Photograph Settings" bill of fare in Google Photos. Tap on "Prison cell Data Usage" and toggle this selection off.
Office iii
Part iii: How to terminate Google Photos fill-in on PC
Wondering how to stop Google Photos fill-in on your PC? There are several means to practise this. We volition show you lot the nigh common ones in this section and explicate unproblematic steps to complete them.
Method 1 - Quit "Backup and Sync"
Just like on your smartphone& you can have Backup and Sync on your PC. All you lot need to do is quit this characteristic& and Google Photos will finish backing upward. Here's how to do information technology in simple steps:
Step 1 – Go to the system tray on the taskbar at the bottom-right corner of your PC screen.
Step 2 – Click on the Fill-in and Sync icon to open the associated window.
Step 3 – Click on the three dots at the acme-right of the window (Menu button) to go a list of options.
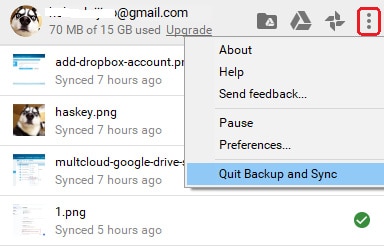
Pace iv – Roll to the concluding option on the card "Quit Backup and Sync." Click on this& and you volition stop the backup procedure immediately.
Method 2 - Suspension Fill-in and Sync Temporarily
Sometimes& yous don't desire to finish the backup procedure completely& and you lot only need to pause it for a while. In this case& you can pause backup and sync temporarily.

To do this& follow steps i to 3 listed under "quit fill-in and sync" in a higher place. Notwithstanding& you should click "Pause" instead of "Quit Backup and Sync."
Method three - Disconnect your Google Account
One of the easiest ways to stop Google Photos fill-in is to disconnect your Google account. When you lot practise this& Backup and Sync no longer take a destination to store files. As a result& the backup procedure stops automatically.
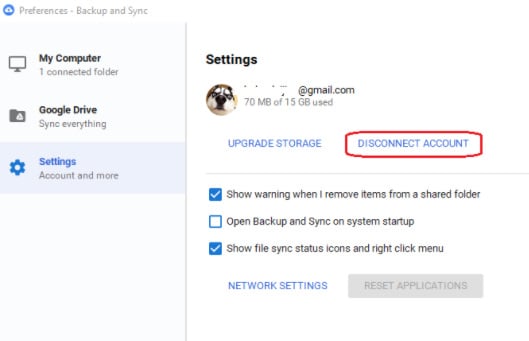
To practice this& follow steps 1 to 3 under "quit backup and sync" above. Now& select "Preferences" from the list of options. This volition present yous with a list of options& including "Settings." Click on "Disconnect account." Later doing this& Google Photos will no longer dorsum up photos or videos.
Method 4 - Uncheck the source folders checkbox
When there are no source folders& Backup and Sync cannot piece of work. This is why unchecking the checkboxes abreast all the possible source folders is a possible solution. Y'all tin can practise this from the preferences window you opened under "disconnect your Google account" above.
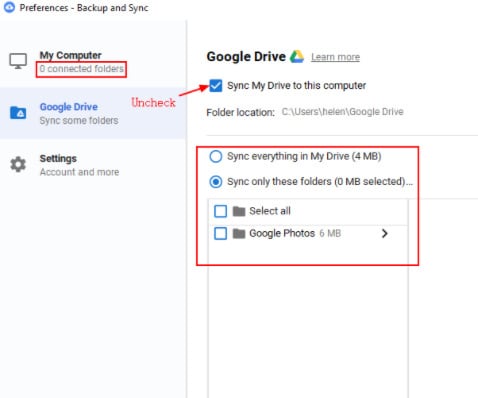
If you desire to disconnect every source binder& then uncheck the box beside "Sync My Drive to this Computer."
Office 4
Function four: Google Photograph Alternative
Now that you know how to stop auto fill-in in Google Photos permit's have our discussion further. Do yous know that in that location are several alternatives to Google Photos? Google Photos is a cloud bulldoze similar to Dropbox& OneDrive& Box& etc.
What this means is that yous tin can salvage your photos and videos on any of these other drives. One of the easiest ways to drift your files from Google Photos to any of these alternatives is through 3rd-party software. Allow the states to introduce you lot to the all-time cloud management software on the market& Wondershare InClowdz.
This app allows you to migrate files across cloud drives. It also helps you lot to sync deject drives and manage the files on a particular cloud drive. Permit's show you how to employ Wondershare InClowdz to migrate files from Google Photos to a different drive.
![]()
Drift, Sync, Manage Clouds Files in One Place
- • Migrate cloud files such as photos, music, documents from one drive to another, like Dropbox to Google Bulldoze.
- • Fill-in your music, photos, videos in one could drive to another to keep files safe.
- • Manage all cloud drives such as Google Bulldoze, Dropbox, OneDrive, box, and Amazon S3 in one place.
- • Sync clouds files such as music, photos, videos, etc., from one cloud drive to some other.
Step 1 – Download and install Wondershare InClowdz.
Stride 2 – Launch the app and click on "Migration" in the left pane.
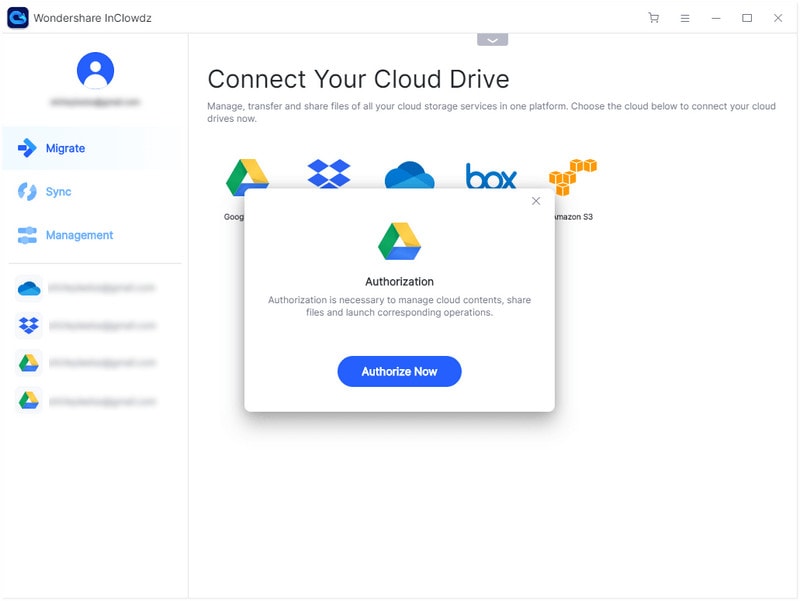
Step 3 – Click on "Add Cloud Drive." This will enable you to add Google Photos and any other drive that you want.
Step 4 – Accept the steps provided on the screen to authorize the drives.
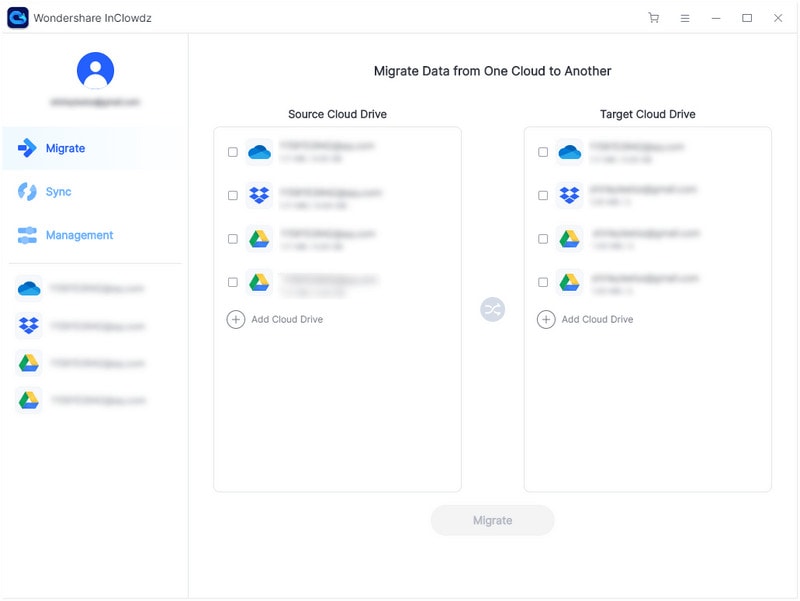
Step 5 – Click on Google Photos under Source Drive and select the photos yous desire to migrate. If you adopt migrating the whole drive& click in the checkbox beside the drive name.
Pace vi – Select the target drive and click on drift. The migration process will begin immediately.
Part five
Conclusion
So far& in this post& nosotros have shown you how to cease Google Photos backup on unlike devices. In the last section& nosotros explained that Google Photos has several alternatives. You tin use Wondershare InClowdz to migrate the files in your Google Photos drive to any alternative you desire.
Share

Source: https://inclowdz.wondershare.com/cloud-manage/how-to-stop-google-photos-backup.html
Posted by: volkertthaveng1970.blogspot.com
0 Response to "How To Stop Google Photos From Auto Uploading"
Post a Comment